╚±“Ņ„ĒĶĻ
Butted Mail
Butted Mail:
A Mailmaker's Guide
4th Edition

Mail is formed by the interlinking of metal rings. The resultant mesh of
links gives a strong flexible armour which provides excellent protection against
most cutting blows. It is also beautiful to look at! Note that mail is
the correct medieval term, probably derived through the French maille and
Italian maglia from the Latin macula meaning the mesh of a net.
The modern term chain mail is a pleonasm.
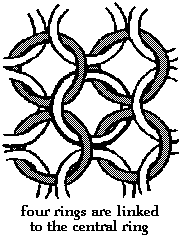
The common type of European mail is illustrated to the right. It has a basic
pattern where each ring is linked to four others. It is therefore known as
four link or single mail. Other patterns are possible, such as
six link and oriental styles like Futaye (four into one cross
linked) or Hana (hexagonal).
In its basic form European mail was constructed of riveted links. A
variation, used in Roman and pre-fifteenth century mail, had alternate rows of
welded and riveted links. Another variation was Jazeran, being a stiff
mail used for collars and the like, made of thick links. This guide is intended
for the re-enactor who is interested in making good looking, well fitting mail.
It will therefore only be concerned only with the production of four link
butted mail (mail with the rings simply closed in a circle with the ends
butted together).
 A number of misconceptions exist about the manufacture of
mail garments. Mail does not take years to make nor does it require fantastic
technical skills or great physical strength. What is required is common sense,
plenty of spare time and most of all patience.
A number of misconceptions exist about the manufacture of
mail garments. Mail does not take years to make nor does it require fantastic
technical skills or great physical strength. What is required is common sense,
plenty of spare time and most of all patience.
Another misconception is that mail is heavy and cumbersome to wear. The
weight of a mail shirt will depend on the thickness of the links, the length of
its sleeves and its overall length: a knee length Norman one is probably going
to be a lot heavier than a short fifteenth century one. The heaviest shirt I
know of is in Edinburgh and weighs 14kg; most surviving shirts are lighter than
this. This may sound heavy, but when worn the weight is well distributed and the
mail is flexible, so it is quite comfortable if tailored correctly.
Medieval mail was normally constructed of iron wire, sometimes decorated with
brass edging rings. Plain iron wire of useable size is not easily obtainable
these days; however, galvanised iron wire is. This is in fact a beautiful
material for making mail: it is inexpensive, easily obtainable, nice to work
with, and only rusts on the ends where the links are cut.
The cheapest way to buy it is from builders merchants (as fencing wire) or
large ironmongers in sizeable coils (5kg is a convenient weight). If you buy it
from your local hardware shop in 0.5kg rolls it will cost a lot more. For
particularly impoverished armourers coathanger wire can also be used. A
coathanger will give about three feet of strong, non rusting wire of about 13
gauge thickness. Unfortunately not all coathangers are of the same colour or
thickness and the scavenging of hundreds of them strikes me as being more
trouble than it's worth.
Brass or enameled copper wire can be used for edging although these
materials, being somewhat soft, tend to unbut rather easily.
Period mail links are generally of a 'D' or flattened cross section. Don't
worry about this; it just means your mail will be slightly over weight. (Anyone
getting close enough to spot this is more likely to tell you it isn't riveted!)
There is no set size, per se, for links. Medieval rings vary from suit
to suit with even armours from the same period and district being made from
different sized links. The mail maker, regardless of the period of the person
being portrayed, is therefore free to choose whatever size of link he finds
appealing. The appearance of the finished mail article will depend upon the
thickness of the wire used and the diameter of the former upon which the links
are wound.
The following table shows what sized links can be made from a given wire
thickness. I have also included a conversion from millimetres to inches to help
people who cannot think metric.
| Wire Size |
Ring Size |
| Gauge |
Diameter of Wire |
Minimum |
Maximum |
Recommended |
| (SWG) |
(mm) |
(mm) |
(mm) |
(mm) |
(in) |
| 13 |
2.3 |
9 |
18 |
14 |
9/16 |
| 14 |
2.0 |
8 |
16 |
13 |
1/2 |
| 16 |
1.6 |
7 |
13 |
8 to 10 |
5/16 to 3/8 |
| 18 |
1.2 |
4 |
10 |
7 |
1/4 |
| 19 |
1.0 |
2 |
8 |
5 |
3/16 |
| Ring size is internal diameter of link and diameter of former. |
| Links of minimum size give a close inflexible mesh. |
| Links of maximum size give a very open mesh. |
| For any wire gauge a former of around six times wire diameter gives a
good looking ring size. |
| The following should be considered when choosing a link size:- |
| Using a thinner wire will reduce the weight of the suit. |
| Thicker wire will allow larger link sizes to be used and increasing
the link size decreases the number of links required. |
| Thick links require more effort to cut and close than thin
links. |
| Thin wire unbutts more easily than thick wire. |
| Small links look prettier than large ones. |
For a convenient size to start with I would recommend 16 gauge wire wound on
either an 8mm or 10mm former.
Links are formed by winding a coil of wire which is then cut along its length
to give the individual links.
Winding wire onto a stationary former is a tedious process so you will
require some form of coil winder. A simple way of making one is to take a hand
drill, clamp it into a vice and put the former straight into the chuck.
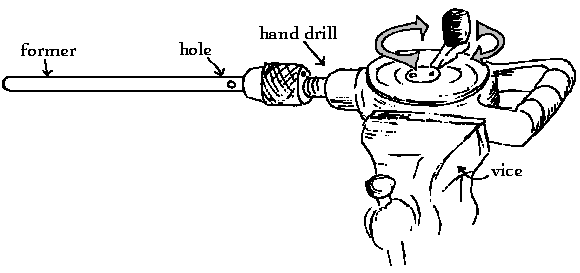
Another simple machine is a hand cranked mandrel.
This is made from a piece of two by four wood about two feet long with a pair of
wooden uprights mounted about one inch from the ends. The two upright blocks
have holes drilled in them to take the former. Various sized formers can be
accommodated by drilling a series of different sized holes in the end pieces.

Both winders are used in the same fashion. The end
of the wire is inserted into the hole in the former and the handle turned slowly
so that the first loop around the rod will be loose and protruding. This allows
it to be cut when you have finished winding the coil (otherwise you won't be
able to get it off the former). 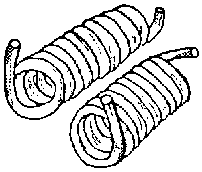 Wind the wire
tightly in a coil to within an inch or so of the end of the former and stop. Cut
the end of the wire and the starting loop and then slide the coil off the
former.
Wind the wire
tightly in a coil to within an inch or so of the end of the former and stop. Cut
the end of the wire and the starting loop and then slide the coil off the
former.
When winding wire wear a pair of gloves to save your hands getting worn out.
Use one hand to crank the mandrel and the other to feed the wire evenly onto the
former.
After the coil has been wound, the individual links will need to be cut. If
you are using a metal former you can cut them with a chisel, (having a slot down
the former helps); otherwise you need to use a pair of cutters.
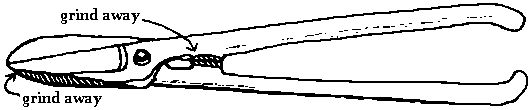
For thin wire
(16 gauge or less) an excellent cutter can be made from a pair of jewellers' 5"
snips. Take the snips and grind a small amount off the faces as shown. Before
cutting open the coil up so that you have about one wire's thickness between
each winding. Insert the cutter as far as the ground jaws will allow, hold the
first half dozen windings between finger and thumb and close the cutter. In this
manner you should be able to cut three to six rings at a time. Opening the coil
before cutting saves having to open all the links individually before joining
them together.
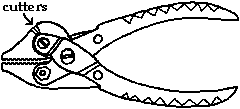 If you are using thick wire, such as coathangers, you
will require a stronger pair of cutters such as a pair of parallel jaw action,
side cutting, pliers. To use these simply insert the top edge of the coil into
the cutting jaws and squeeze the cutter. Unfortunately, this method only cuts
one link at a time. You are also going to have to open all the links.
If you are using thick wire, such as coathangers, you
will require a stronger pair of cutters such as a pair of parallel jaw action,
side cutting, pliers. To use these simply insert the top edge of the coil into
the cutting jaws and squeeze the cutter. Unfortunately, this method only cuts
one link at a time. You are also going to have to open all the links.
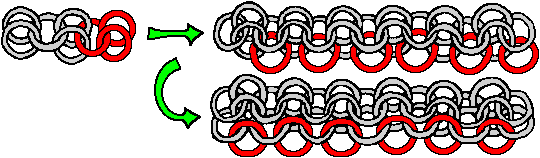
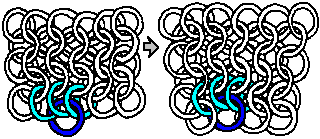
Take an even number of rings (around ten) and close
them. To do this simply hold one side of the ring with a pair of pliers and
using a second pair force the ends shut. Next take an open link and thread four
closed ones onto it; close the link. The result should look like stage 1 in
the figure above. The location where the next set of rings should be added is
shown in red. To do this add another open link through a pair of links on one
side, then another pair of closed links and close the link. Continue this
process until a chain is obtained, add a link at each end and it will look like
the second stage in the figure.
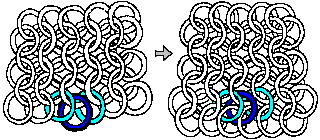
Start expanding the chain by adding the red links shown in stages 2
and 3 of the figure. Continue this pattern of expansion until a reasonable
sized oblong is obtained. This oblong can then be used as a starter piece to
build into the item you require.
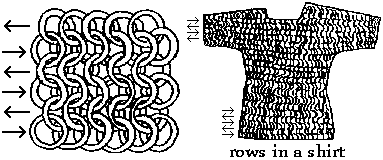 It is extremely important that mail hangs correctly. If
mail is hung incorrectly the links spread apart defeating the purpose of the
armour. The diagram to the right shows how mail consists of rows of links
(the arrows show the rows and the way the links in a given row lie). For mail to
hang correctly the rows must be horizontal.
It is extremely important that mail hangs correctly. If
mail is hung incorrectly the links spread apart defeating the purpose of the
armour. The diagram to the right shows how mail consists of rows of links
(the arrows show the rows and the way the links in a given row lie). For mail to
hang correctly the rows must be horizontal.
All the surviving pieces of mail I know of are constructed in this way. If
you see a coat of mail with rows that appear to hang vertically, it's probably
made of knitted string! (This can otherwise look quite effective, but from what
I can remember about the Robin Hood series on British TV, the actor playing
Guisborne had to be cut out of his mail when it shrank after a muddy pond
fight.)
Like any other garment mail has to be tailored to fit the body. There are two
ways to do this. The first is to change the link size; larger links being used
to expand a piece and smaller to contract it. This method is however of limited
use, being practical only where small changes in size are required such as
tapering the diameter of sleeves. The second method is to simply create or
remove rows or columns. This is the commonly used method for tailoring.
The normal way to add a link to a piece of mail is to loop it through two
rings in the previous row. To contract a piece, place a link through
three rings instead. This effectively removes a column, decreasing by one
the number of links per row.
To expand a piece add an extra link to the bottom of the mail. This extra
ring goes between two others so that a link in the row before the bottom will
have five others linked to it instead of the usual four. This increases
by one the number of rings per row.
The above two methods are
"column" adjustments. You will observe that an expansion is effectively the same
as a contraction, but the other way round.
Always try to spread your contractions and expansions out; if you have too
many too close together it will be very noticeable. This is because both changes
produce an idle ring, that is a link that is connected to only three
others and if too many changes are made in a small area these links will stand
proud.
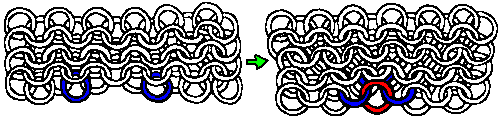
To
form this type of contraction leave a gap of one link in the row between the
blue rings in the figure above. On the next line add a link (shown in red)
between these rings. This narrows the sleeve by two rows per contraction.
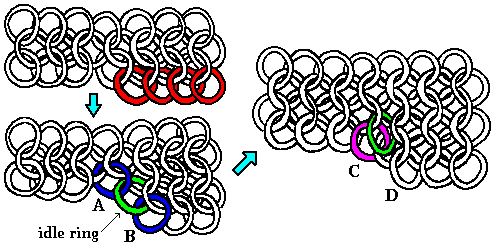
From the point at which you wish to make the expansion, add a
partial row of links (coloured red in the figure below), then add a second row
on top of this, as shown. Next, add a complete row of links. This will mean
joining two rings on different rows (blue links A and B in the figure) with a
"crossing link" (purple link C). This process leaves a single idle ring
(coloured green). Another complete row of links is then added. (This will
involve joining the links labelled C and D in the figure.) You can now continue
to add rows as normal. The result will look crooked at first, but this will sort
itself out once you've added enough rows.
Note that the "hole" row contraction can also be used in reverse to add rows,
and the "knot" row expansion can be used for contractions. In the hauberk
described below, the "knot" method is avoided in the sleeves, probably because
the idle rings would tend to catch and be uncomfortable. The "hole" method is
used instead: the small gaps this construction leaves would be unlikely to cause
problems, as they are on the underside of the sleeves.
Regardless of the method you use, you can only add or subtract rows in pairs,
for reasons that should be obvious!

The medieval armourer probably did not work from written patterns but rather
from experience and a mental concept of how the finished article should fit. I
recommend that you work in the same manner. First plan how and where you are
going to shape the piece, then build it row by row, adding the required
expansions and contractions in a logical fashion as the work progresses. Always
remember to allow space for padding to be worn under your mail.
Please note that the pieces discussed in this guide are examples of existing
armours. They are not the one true way to do things. Suggestions for
further reading are given later.
This is a covering for the head and neck normally worn under a helmet. The
following design is based upon a 14th Century example from the Royal Scottish
Museum. The original was made from alternating rows of solid and riveted iron
links, flat in section with an average thickness of 1mm and an exterior diameter
around 11mm. The coif is constructed in five stages (figure 1). To start
build a rectangle of mail (A) that will fit around the back of your head from
one side of the face to the other. Extend this upwards and around (B,
figure 2) so that it is the right size to cover the forehead. Allow two
single expansions (F) for the temples if you wish. Join the two sides (G) of the
forehead together to produce the shape shown in figure 3. Continue to build
upwards (C) but now start contracting to cover the skull. The original coif has
seven "lines" of contractions, that is contractions set one above the other,
with each "line" having between 8 to 10 contractions in it (figure 4). Each
line is generally built up with one contraction in every other row. You will
obviously have to alter this number of contractions to suit the size of link you
are using and the shape of your head. The skull is topped by a single ring
(shown red) which will have to be slightly larger than the other links in the
coif to enable it to fit. Having built the top of the coif now start working
downards (D) to form the chin and neck covering. Leave a slit one column wide in
this section otherwise the coif will not fit over your head. 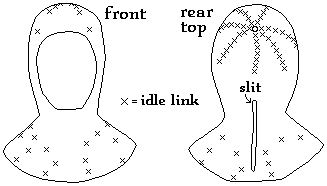 The
slit is at the back and is closed by a leather thong when the coif is worn; it
is needed because this design of coif is tight fitting around the face. Continue
working down and around and join the two sides together around the chin. As the
face tapers downwards there will be more links in the row at the top of the face
opening than at the bottom. Figure 5 shows the shaping of the original;
adjust to fit. Finally expand the coif downwards and out (E) to cover the
shoulders. Spread the expansions so that they will not be too obvious. You will
require around one expansion per row to give a good looking "flair".
The
slit is at the back and is closed by a leather thong when the coif is worn; it
is needed because this design of coif is tight fitting around the face. Continue
working down and around and join the two sides together around the chin. As the
face tapers downwards there will be more links in the row at the top of the face
opening than at the bottom. Figure 5 shows the shaping of the original;
adjust to fit. Finally expand the coif downwards and out (E) to cover the
shoulders. Spread the expansions so that they will not be too obvious. You will
require around one expansion per row to give a good looking "flair".
The following design is taken from a short sleeved mail shirt number A2 in
the Wallace collection. It has riveted iron links of half round section (the
flat side facing outwards when worn), which are 0.99mm thick and have an
external diameter of 10.3mm. The shirt is bordered at the neck by one row and at
the wrist by two rows of brass links. The sleeves reach to the elbow and are
30.4cm long from armpit to end while the total length of the shirt is 71.1cm and
its weight 8.84kg.
To construct a similar shirt work as follows: to start, make the part that
fits around the neck. This is a rectangle of mail with a square hole in it large
enough for the head to fit through (figure 1, below). Enlarge this piece
until it covers the top of the arms and the front and back of the trunk to just
under the armpits (figure 2).
As you are building this piece you will
have to add a set of expansions over each shoulder. These run from the collar
bone at the front to the top of the shoulder blades at the back (figure 3).
They are there to form a bag enabling the shoulder to move without straining the
links. The original suit has nine expansions in each set with one idle link in
every other row. Next join the start of the sleeves around the arms and the
front and back of the hauberk around the chest. The sleeves should be very wide
at this point to allow plenty of room for movement. You will now have a hole at
each armpit where the mail running around the body meets the bottom of the
sleeves. Here you will notice that the rows are running at right angles to one
another and should be joined as shown below.

Now start extending the sleeves. As you
build towards the elbow you will wish to decrease the diameter of the sleeve for
which you will require a number of "hole type" row contractions. The
method of forming these has been described above.
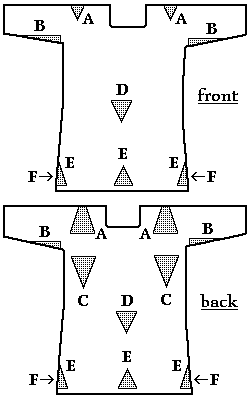 Now return to the main trunk and start building
downwards. As you build you will have to make further adjustments to fit the
contours of the body (see figure). The complete list is as follows:
Now return to the main trunk and start building
downwards. As you build you will have to make further adjustments to fit the
contours of the body (see figure). The complete list is as follows:
| A |
Two lines of expansions over the shoulders. |
| B |
Row contractions to taper the sleeves. |
| C |
Two lines of contractions under the shoulder blades to compensate for
the expansions over the shoulders. Original suit has nine contractions per
set with one contraction every four rows. |
| D |
Contractions for waist. Wallace suit has two sets of four
contractions; one at the front and the other at the rear. |
| E |
Expansions for the hips. Original suit has four lines of these, two at
the sides and one at the front and back. Each line has one expansion per
four rows. |
| F |
Two knot type row expansions per side to make the back of the suit
four rows longer than the front. |